Showing posts with label Kids' room. Show all posts

Monday, March 5, 2012

An afghan blanket for Luca


This weekend, I finished up a little something for Luca.  A chevron pattern merino wool (blended with a little cashmere--so luxurious!) blanket that I crocheted for him...and just to give you a little sense in which the speed I crochet...I bought the yarn and began this project back in January 2009.  Its been a long time in the making!  Way too long actually..


The colors are red, cream, a kind of turquoise/robin's egg blue and navy blue--
although I know it looks like black in the photos.


Crocheting a blanket is the kind of project I love most.  This is my second blanket crocheting endeavor.  I pick it up and put it down when it feels good...mainly in the fall and winter months.(Nothing quite like a pile of wool draped over your legs while watching a movie at home in a humid DC July!! : )


But for some reason, this project was put down way more than it was picked up...probably moving twice in the last three years didn't help; neither did doing all this crazy blog stuff NOR having 2 kids, 6 and under!

The half-worked project, just kind of bundled, living in its basket--kept looking at me every time I plopped down on the couch to watch something...I would look at it back, but not compelled enough to pick it up, until one day Luca said...Mama, when are you going to finish my blanket?  Oh, gosh...good question.  Maybe I should finish it.  After all, that yarn was NOT cheap!  And it would be nice to have it done...

And then, just like that, I picked it up again--and--as things are with me...I got totally back into it and became totally crazed to finish it...I crocheted every chance I got--and with a very special thank you to DOWNTON ABBEY (I tended to crochet the most on Sunday nights, in front of our tv, which is faithfully tuned to PBS)...I got it done!  Finished dimensions are 30 x 60...Luca is very happy!


And I got it done, it should be noted,
just in time for those upcoming summer months!!  : )
Nice timing.


Monday, August 22, 2011

A Clean Home


This weekend, the kids were away with their grandparents at the beach...This weekend, it was just me and Greg...

this weekend was our 7th wedding anniversary...

This weekend, we opened a 2-day can of WHOOP ASS on our house...cleaning, organizing and generally improving our overall quality of life.  

I know--I can hear the groans and the "really?!?'s.  We were planning on going to the Shenandoah Valley and stay at a little bed and breakfast...but nooo...we stayed and we cleaned.

For the record...it was a joint decision.  We weighed the pros and the cons...And now...we feel AMAZING!! As we start the new school year, next week:  every sock has a mate (this alone would have been worth it...), every item of clothing is age appropriate, i.e. no more size TWOs lurking anywhere...every room has been deep cleaned...the basement (which has been a dumping ground since we moved in is a SIGHT TO BEHOLD, a THING OF BEAUTY!! ok, that maybe going too far...but its close!  The porch floor is like 99.9% free of 50 year old adhesive/linoleum.  The playroom, which instilled dread in my heart every time I walked in is now like a friggin' NATURE PRESERVE!! Its so calm in there--I love it.

There are SEVERAL bags/boxes of clothing/items that will be picked up by the local goodwill on Tuesday...off to new homes and to people who need them...

You know that saying: nothing tastes as good as feeling thin feels...

well, SURELY this saying must be able to be worded in such a way that it would apply to our situation today, but I am really worn out and can't quite figure it out...but you get the idea.  We did go to a nice sushi dinner Saturday night...so not all work.

And since the house is so picture-perfect, I thought I would take some photos...you know, just to remember how the house looked...because this feeling and our clean house will be fleeting...

the kids come back tomorrow.

: )


Friday, August 12, 2011

The Quest for World (ok-house!!) Domination Continues!


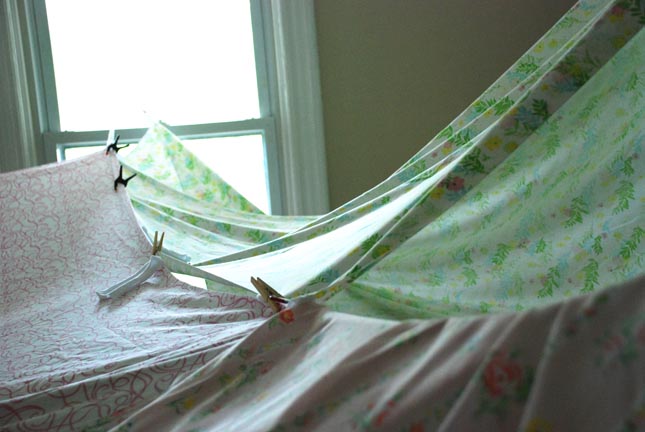
The fort building goes on with more sheets, more panels and more rooms...


I have to say, Magda took on the lead role as head architect with gusto, determination and vision.  And for me--the assistant, I just helped a teeny-tiny bit...mainly just reaching to stick suction cups, up-high, where she couldn't...I swear, that's it!!


But the orders for more sheets/panels kept coming and I kept sewing...
I think we are up to four twin-sized sheets now sewn
with t-shirt loops at the corners and mid-points...

Close-pins work awesomely for keeping it all together!


What is it about cozy spaces that makes makes everything so much more fun??


Monday, August 1, 2011

DIY: FORT BUILDING KIT


Late last year, while watching the kids make forts out of blankets and quilts--and getting frustrated with the whole thing coming down time after time...I thought--surely there must be something online, an idea or a tip, that can help with this dilemma...I only had to google FORT MAKING to stumble upon this amazing gem of inspiration and how-to.  This Saltwater Kids blog tutorial on a how to make a FORT MAKING KIT was a huge help when I got it together to make a  kit for a birthday present for our neighbor friend but that was last year and I haven't really thought about it...

until this weekend rolled around...


Greg is still busy with the porch, and its STILL a ba-zillion degrees outside and I was thinking what ever could we do on a Sunday afternoon...the fort came back into mind and me and the kids sprung into action...


(First, let me state..this is a work in progress.  We plan to add onto this, making more panels...more rooms...pretty much, we are planning to take over the whole house!)

For a detailed step by step, please do check out the Saltwater Kids blog...seriously, it is so good--but for a quick summary and to see what I did, here goes:  I had acquired all the supplies when we made the first kit last year, so all I had to do was dig everything out from the basement...

here's what we used:

1) one flat twin sheet from our local thrift store--which was about $2.  We will add more sheets as we continue to expand and take over the house, but for now--we just started with one panel (aka sheet).


A variety of supplies from the dollar store including:
1) Nylon rope
2) cloth pins
3) suction cups
4) metal clips
5) flash lights/batteries

about $10.


One large t-shirt to cut into strips that get sewn to the corners and mid-points of the sheet.

$3.


I took about 12 inches of a t-shirt strip and sewed the loops to the four corners and mid-way length-wise on the edge.  I also sewed a loop in the middle on the underside because it might be good to have a loop on the underside to run a rope thru...just saying...always good to be prepared.  I reenforced all the stitches as shown.


We then applied the suction cups to the windows, to the glass door of the fire place...we strung up the sheet using cloth pins, clips and the nylon rope...


And there you go!! For the most part, it stayed up pretty well--dollar store items are a dollar for a reason... but MUCH better than trying to tie the corner of a quilt to a chair--and hoping it stays put.  This is as far as we got yesterday but we will continue for world domination as we add more panels... Thrift store sheets are cheap.


"Ok, Mom...your job is done--you can go now and no, you can't play with us!!"


Friday, February 18, 2011

Paper Cutting

I painted Magda's room last summer and then proceeded to rearrange her furniture.  The new configuration left bare a HUGE hole I made hanging some art that wouldn't work with the new set up..all this is to say: I had a bare wall with a gaping hole that desperately needed some new art work to cover it all up. This was a craft emergency; I had to make something--but what?  After much thought and deliberation, I settled one of my favorite crafts of all time...cutting paper.


click on images to get a better look..


My fave for this is Amy Karol over at Angry Chicken.  She has a great blog and she offers eMail Orders for her different original craft projects.  #8 & #10 each offer 4 different patterns.  You can go here to check out.  I have downloaded her pdfs in the past, cut them out and framed them for gifts--which I think is so very sweet.  I am always really pleased with how they turn out.


click on images to get a better look..


Amy gives very clear and helpful instruction and tips (mainly just use a very sharp x-acto knife) These come together so nicely and easily, I whole-heartedly recommend them.  And then, when you get really hooked, you can look to the magical work by Elsa Mora for inspiration...OR you can just get lost in it...either way is good.

Wednesday, February 9, 2011

Magdalena's Room

These started out as the panels for a puppet theater but work better as curtain panels for her closet in our new house. Its kind of a random block pattern that is way easier to put together than it looks. Crucial that all cuts are exactly the same size and then it kinds of lines up all by itself...if you look closely, you can tell that I did not follow my own advice! I LOVE the pom-pom trim...