Showing posts with label Skin Care. Show all posts

Monday, June 13, 2011

DIY: Citrus & Herbal Soap


It was Grandmom Chrystie's birthday this weekend and Magda & I put our heads together on Saturday to try and come up with an idea for a nice gift we could make for her...I remembered back in an early Spring issue of Martha Stewart Living, (the April issue) there was a vibrant feature on diy (melt & pour) soaps in which citrus and herbs were added to the melted soap.  Magda thought that was a perfect idea, so that's what we did.  It was so easy and as you can see, the results were pretty and wonderful!!
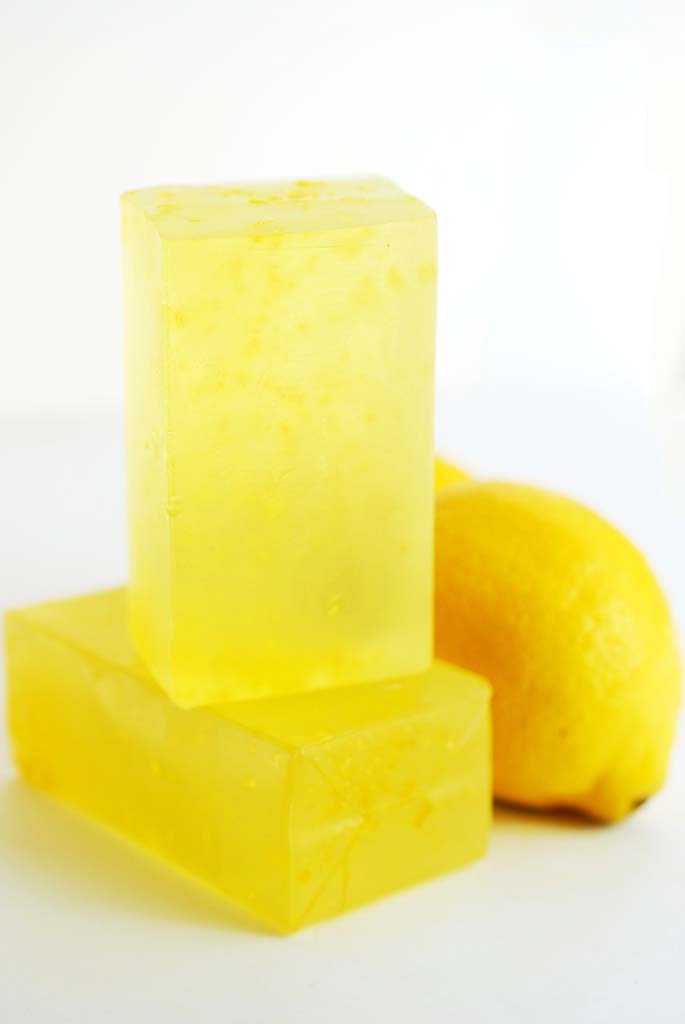


I'll leave the detailed how-to to Martha...check it out here for the easy and basic instructions--there is a video, too.  But basically, you grind up your flavor of choice in a food processor and add it to melted glycerin soap that you've poured into a container...we hit the recycling bin for our containers...frozen juice concentrate containers were great to slice into disks of soap.  I like the square shape of 1/2 & 1/2 container...also, kids juice box makes for a soap that is easy to hold in your hands.


Soap mold for this one was the bottom of selzer bottle.


I melted the soap on a double-boiler on the stove.  We sprayed the inside of the containers with a spray olive oil.  I poured in the hot liquid soap; letting it sit and cool for a minute or two.  We added the grinded-up peel/herb one teaspoon at a time, till we felt it was the right amount...nothing precise about this--we just totally eye-balled it! : ) and Magda stirred with a chopstick, to keep everything from settling to the bottom.  


Basil & Mint soap in heavy whipping cream container--cream was used to make a birthday treat!


Sage soap.  I used Whole Foods chicken stock container-the square box kind.


After about 5 mins or so of stirring, we popped the containers of soap into the freezer to set up and hardened.  About 20 minutes.  After its ready, the soaps should either just pop out of the plastic containers or you can tear the paper containers away.  And Volia!  You have a lovely bar of home-made soap.  Some flavors smell stronger than others...if you want a strong scent, it would be good to stir in some essential oil right before putting into freezer.


Thyme.  Kids' juice boxes.


This was a really nice, easy project and I highly recommend it...perfect gifts for you and your favorite 6 year old to make together.


Wednesday, May 18, 2011

DIY: Rose Water


I have this gorgeous, semi-wild rose bush out my back door.  I say "semi-wild" because I am not sure whether it has ever been properly pruned...I know we have never paid much attention to it.  Except last year, I did shove a trelis behind it and tied some branches back (not knowing what I was doing) in hopes to train it a bit--but more: so that the thorns wouldn't hit us in the face everything time we came out said door!  


So, it is a goal of mine to learn a little bit more about how to care for our lovely plant.  
But in the meantime...I just needed to figure out what to do with all the gorgeous blooms!!


I always liked the idea of rose water...but wasn't exactly sure what it was or what it was for.  Well, I found out and I made some...The process and the result were both equally lovely.  


With all good things I seem to be making lately, it starts with a good steep!  I separated about 2 cups (packed) of petals from flowers/stems/leaves...I rinsed them and put them with about 4 cups of water in a medium sauce pan over a medium heat.  As soon as it came to a boil, I turned off flame--covered with lid and let sit over night.  An hour probably would have been good, but I was going to bed anyway and figured a longer soak couldn't hurt.  In the morning I strained out the petals and was left with a beautifully deep pink-red liquid.  But now what to do with it?

As is, it makes a lovely addition to recipes.  All you have to do is google Rose Water Recipes and a plethora of ideas come up.  I was more thinking in terms of skin care...like my Facial Mist post (see here)
I thought rose water would make a really nice mist and it does.  I combined mine with about 2 tablespoons Witch Hazel and 1 tablespoon of aloe vera gel (per 4 ounces of rose water) and the end result could not be nicer.  If you wanted more of an astringent toner, you could 3 parts water to 1 part witch hazel of alcohol (like vodka) and that could be quite cleansing and refreshing.

It will last longer in the fridge, but as is--around 12-14 days.  If you do add witch hazel or alcohol, it will last longer.  Its very important that if you do make rose water to eat or put on your skin that you only use organic roses and wash the petals well.

I loved making this...it felt like I was making an old-fashioned potion and it smells heavenly.
It would be nice to combine scent of roses with orange or jasmine too...


Friday, March 25, 2011

DIY: Your Own Labels


Since I have been making (or let me re-phrase that..attempting to make) my own skin care products--and I always end up making way more than I can use, I thought it would be fun to bottle them up and give them as gifts to my friends, family...strangers on the street...anyone who would take them...(just kidding) So, thanks to my dear sis-in-law and whole foods, I obtained some very sweet little bottles.  But the problem is: the plain bottles are so, well, plain and don't really do a good job explaining what's inside.  I don't have a color printer at home and honestly--every time I have tried to print out labels, my alignment is way off and its just becomes a big mess...Hmmm, what to do, what to do...

so...I googled: how to make custom labels...

and this is what I found:


I LOVE THESE GUYS...this is such a great service...they make labels for EVERYTHING: beer & wine bottles, all things holiday, photo labels, labels for food and crafty gifts...you may not think you need them now, but just wait: when you want to give a bunch a people the same gift and want to tell them exactly what is in it, this will come in handy...I guarantee it!

Here's a little sample of what I did:


Get the recipe for the facial mist here and for the toner here.

You probably can't see it but at the bottom is the list of ingredients.  The website has many decent designs you can choose from or you can design your own. The labels can be printed on paper or they can be waterproof which is nice for bath items.  The colors are not exact, but that's ok; its close and for the price, totally worth it.  This is especially nice for weddings, birthday favors, parties, small businesses starting out...you get the idea...

So, while its not exactly do it yourself, because someone else is doing it; it is personalized and you can design your own thing which is WAY nicer than just a plain bottle.


Thursday, March 10, 2011

DIY: Facial Mist


For two years, during college, I lived in San Francisco and from time to time,  I would drive across the Bay Bridge to Berkeley and hit all my faves: Blondie's Pizza, Moe's Books and the original Body Shop--I especially LOVED this Body Shop shop because it was the original store and all of the products were so simple, lovely and natural.  Do you know the story of how it all started?...check this out:

In the early 1970s, Anita Roddick (then Anita Perilli) visited a shop in Berkeley, California selling naturally-scented soaps and lotions called The Body Shop. The Berkeley Body Shop run by Peggy Short and Jane Saunders used natural ingredients, and helped to employ and train immigrant women.The Body Shop name was a clever pun, as the original Berkeley store was opened in a converted auto body shop, C.J.’s Old Garage on Telegraph Avenue.

The natural, environmentally-minded and intimate cosmetics shop inspired Anita Roddick to open her own shop back in the UK in 1976. In 1987, Roddick purchased the naming rights from the original Body Shop. From its first launch in the UK in 1976, The Body Shop experienced rapid growth, expanding at a rate of 50 percent annually. Its stock was floated on London's Unlisted Securities Market in April 1984, opening at 95p. After it obtained a full listing on the London Stock Exchange, the stock was given the nickname "The shares that defy gravity," as its price increased by more than 500%.

In March 2006, The Body Shop agreed to a £652.3 million takeover by L'Oréal. It was reported that Anita and Gordon Roddick, who set up The Body Shop 30 years previously, made £130 million from the sale.  (excerpt from wikipedia)

And so The Body Shop went from teeny-tiny to mega-bucks...and their ingredients went from totally natural and pure to kinda/not so much... But I couldn't help myself once, 2 or so years ago, when I had some time to kill at the Baltimore International Airport and I wandered into one of the now--super slick franchises.  Nostalgia drew me in and I was wooed over by all the fancy bottles and pretty smells.  Before I knew it, I had walked out of the store with my purchases.  One in particular, the Vitamin E Face Mist, was my favorite.  I would spray it on after make-up to help set and for a little moisture...I really, really liked it.  Until...I looked at the list of ingredients:


Water, Butylene Glycol, Glycerin, Panthenol, Phenoxyethanol, Tocopheryl Acetate, Alchohol Denat., Triticum Vulgare (Wheat) Germ Oil, Methylparaben, Lecithin, Rosa Centifolia (Rose) Water, Butylparaben, Ethylparaben, Isobutylparaben, Propylparaben.


And I thought to myself...wow, this such a bummer!! Why do they have to put all that junk, like parabens & Butylene Glycol, in there--it seemed so antithetical to how the whole thing started..and then I got thinking...hmmm....


What of the ingredient list would I want?
Glycerin: produced when vegetable oils (especially coconut oil and palm kernel oil) are turned into soaps and other products; glycerine is produced as part of the process. Glycerine is a common ingredient in cosmetics, toothpaste, drugs, lubricants and other personal-care products because it is a humectant, meaning it helps your skin retain moisture, and is a common processing element in various industries.
Tocopheryl Acetate: Vitamin E
Panthenol: VItamin B5
Lecithin: Fatty substance derived from the soy bean that is used as an emulsifier.
Rosa Centifolia (Rose) Water
Triticum Vulgare (Wheat) Germ Oil

What would I not want:

Phenoxyethanol: a preservative
Parabens: are a class of chemicals widely used as preservatives in the cosmetic and pharmaceutical industries. Parabens are effective preservatives in many types of formulas. These compounds, and their salts, are used primarily for their bactericidal and fungicidal properties. They are becoming increasingly controversial, however, because they have been found in extremely low concentrations in breast cancer tumors (an average of 20 nanograms/g of tissue). [3] Parabens have also displayed the ability to weakly mimic estrogen (a hormone known to play a role in the development of breast cancer).[3] No causal link between parabens and cancer has been established, however.
Butylene GlycolThis chemical is a preservative used to keep skincare and beauty products from spoiling. It’s sometimes used to create a “whipped” appearance to existing products as a marketing ploy or to create more volume in a jar, while reducing the actual amount of product. (In other words, you spend more for less!).
Alchohol: as a cosmetic ingredient, it is used to help emulsify other ingredients because it is a solvent; it has a drying effect.


So basically, my ingredient list would look like this:

Water, Butylene Glycol, Glycerin, Panthenol, Phenoxyethanol, Tocopheryl Acetate, Alchohol Denat., Triticum Vulgare (Wheat) Germ Oil, Methylparaben, Lecithin, Rosa Centifolia (Rose) Water, ButylparabenEthylparabenIsobutylparabenPropylparaben.

Ok...how hard would it be to make it myself??


Turns out...not hard at all...I rounded up all the ingredients at the local co-op.


facial mist recipe
1 tablespoon vitamin e oil
2 tablespoons glycerin
1 tablespoon jojoba oil
1 tablespoon aloe vera gel
4 tablespoons rose water
1/2 cup witch hazel
1 cup distilled water
3-6 drops chamomile
6-8 drops rose essential oil

Combine all ingredients in jar with tight lid and shake well.  
Pour into smaller spray bottles.
After shaking bottle (always give it good shake before using...
mist face after make-up, 2-3 times, or for a little refresher during the day. 
 Especially nice if stored in fridge and used in summer time; 
also helps face feel nice and moisturized during dry winter months.

This batch makes a little bit over 2 1/2 cups.  Extra can be stored in refrigerator until ready for use.

Even though, I just kind of made this up and it does smell and feel a little bit like what I bought, I am by no means an expert or even remotely know what I am doing--mainly, its just a bit of dare/challenge to me to see if I can pull something off that I like...and I do like the spray I made very much.  I totally encourage you to try making your own skin care products, but you too should experiment and play around.  It's really fun and this way, your product will be custom-made for you--by you!


Wednesday, February 23, 2011

DIY: Melt & Pour Soap


One of the best crafty projects I ever made was for year-before-last-christmas-gifts and that has turned into a full-time staple in my home.  And that was the making of home-made soap.  To be clear: there is one thing I do not do from scratch--that is, make the actual soap (its a complicated process involving calculating how much lye to add to your fat to make it soap--I am crazy but not THAT crazy...)  Mine is strictly the-melt-and-pour-kind of technique starting with a solid soap base (I like olive oil) and adding essential oils for fragrance (am so crazy for lavender) and natural additives (I like French powered clay)  The basic recipe for all the soap that I make is a Martha Stewart recipe for an interpretation of Savon de Marseille.  This effort for home-made soap has been made in the same spirit as not wanting any extra added yuckiness in my family's clean regime--so I don't add artificial food coloring/dyes or artificial perfumes.  Just nice and simple; pure and clean.  It could not be easier and when we get low, I just whip up another batch..here's how: 

I buy all my soap making supplies from The Sage; they are based in Utah and so nice on the phone.  I get a 5 lb. tub of Olive Oil Soap base and that lasts for a while.  I also go back and forth between the green clay and the pink clay.  I have been obsessed with Lavender for as long as I can remember..But now, I'm up for trying new scent combos: basil & orange; ylang ylang; peppermint & spearmint combined, vanilla & tangerine, rosemary & sage...time to branch out.  


This is so easy.  Think of the soap base as big hunk of chocolate that you need to melt down to make dark chocolate/sea salt/carmel bark...(ok, well, maybe not quite exactly but same in theory).  Cut a hunk of soap into smaller pieces and put in a metal bowl over a stock pot filled with 3-5 inches of water simmering away in it.  Double-boiler action.  I usually keep flame at medium-high.  Or you could put in a microwave...I don't have one so I am not sure for how long...I guess just check it often.


While that is melting down, get your molds ready.  There are a ton of molds out there to choose from.  Cute & fun to down right cheesy--not a whole lot of them worth buying in my humble opinion.  I kind of like just a simple block bar of soap.  Nothing fancy.  And these containers (along with 1/2 & 1/2 containers and heavy whipping cream containers--love the square shape!) make the best and cheapest molds in my opinion.  Just cut one like this in half--widthwise...or maybe even a little bit lower than the half way point.


As the soap melts, add the clay.   Once soap is fully melted, whisk until soap and clay are fully incorporated.  This may take a while--the clay does not instantly dissolve.  Just keep the heat on medium high and keep stirring occasionally. (But don't ever let boil.) Once you feel like its as good as its going to get--in terms of the clay disolving, turn off flame and add essential oil.

This is my general rule of thumb:  1 teaspoon clay per pound of soap & 1/2 teaspoon of essential oil per pound of soap.  Use your nose and add more if you want it stronger; you probably will but better to start off with less and add a little bit as you go to avoid over doing it (which is what I usually do)...


Add liquid soap to molds.  If you want to use the mold again, you can use a spray oil and coat lightly the inside of the mold.  OR you can tear the mold away once soap is hardened--and not bother with the oil.


Let soap hardened till cool and solidified.  About 2 hours.  Remove from mold (by coaxing out of oiled mold or tearing mold off) and slice into 1 1/2- 2 inch thick bars.  Martha's recipe does a final rinse in warm salt water and while I like the idea of this, I can't really tell what/if any difference it makes..but check out her recipe if interested in this step.

NOTE: I added about a TABLESPOON per pound of the pink clay with this batch because I wanted to try it a little darker.  Martha's recipe calls for one teaspoon per pound...this yeilds a softer, more coral in tone color--which is very nice but not truly pink.  The green is lovely too...kind of a dusty olive. I really like it.

And that's it!  You should try it...its not hard and its really not all that time-consuming--you might just get hooked, like me...and what a lovely gift this would make: a bar of home-made soap be paired with a little crocheted/knitted wash cloth??  Cute!  That project is coming up--stay tuned!


Wednesday, February 16, 2011

DIY: Home-made Facial Toner


THe cleanse I recently did was illuminating in a lot of ways. One major insight gained from reading Dr. Junger's book was the fact that equally important to what we eat and put into our bodies thru our mouth is what we put directly onto our skin (and this is not just limited to soaps, creams & lotions--think about all the chemicals that go into deodorant, perfume, hair products, dry cleaning, etc). I have long made an effort to keep the sulfates, parabens, artificial colors & smells at bay, but recently I went one step further and purged my medicine closet and thru away any and all offenders of the artificial or petro-based kind. And because as much as I LOVE all the organic skin care lines out there, especially Dr. Hauska---I cannot afford them, ESPECIALLY Dr. Hauska...so this is when that handy-dandy phrase pops into my head and sends me into a dither...hey, I wonder if I could MAKE Dr. Hauska...

and sure enough...

I googled...

and I found a recipe posted by DandelionMom

Dr. Hauska Toner Recipe

This is really nice, easy to make AND IT SMELLS AMAZING...my craft room smells like the skin care aisle at Whole Foods...I love it! Just a note: chamomile and rose essential oil are costly. I am looking around for better options/subsitutes and think I found them here and here.  These aren't the oils but they have the essential smell which is what we are going for.  I will try them and report back.  Special thanks to my sis-in-law Gab who lent me her essential oils for the grand experiment. I can absolutely report that this is indeed a VERY nice toner and this has inspired me to make more home-made skin care products. Also, a lot of blogs I follow do these fun give-aways to readers who post a comment. I am not quite ready to host a give-away, but do stay tuned and I will do one soon.

Ingredients

Water
a spray bottle
witch hazel
German chamomile essential oil
rosemary essential oil
Rose essential oil
100% Aloe Vera Gel


Combine 1/2 cup purified water with 2 Tbsp. witch hazel, 2 Tbsp. aloe vera gel, and 3 drops of each essential oil.

Place a funnel over the opening of your bottle and pour the ingredients into the bottle. Screw on the top.

After cleansing your skin with a natural, pure soap, spritz on the toner with spray pump top or dab a cotton ball and allow it to soak into your skin! You will LOVE it!!!