Tuesday, January 3, 2012

Happy New Year Cocktails!


This summer I got into making cocktails (See here and here).  
For Christmas our good friends/neighbors got us this great gift--


PDT (short for Please Don't Tell) is a cool bar on St. Mark's Place in the East Village, NYC
that to get to--you have to walk thru a secret telephone booth door
inside a store that sells hot dogs (Crif Dogs)...
kind of like a modern speakeasy but it's NOT illegal;
 they just did it that way to get around not having to obtain an additional liquor license.
(Crif Dogs already had a liquor license...its complicated...)

ANYWAY...
lets just say the PDT Cocktail Book is like the PhD to the child's play of my past efforts.
As I flipped thru the pages, not only had I not heard of half the ingredients, 
I couldn't pronounce them either.   And there were a LOT of egg whites...

But I was not daunted.  I selected three recipes.  

And then I was off to the liquor store...at 3pm on New Year's Eve day...
not the best time to look for obscure liquor 
when 300 people are in line trying to buy champagne...

but somehow I managed.


We invited M&L--who gave us the book and 
C&E--who have bar tending/cocktail drinking experience 
over for a pre-New Year's Eve party cocktail...

The three recipes I chose, oddly enough represented the past, the present & the future.

For the present, we made The Tuxedo 
(not that any of us were wearing a Tuxedo for New Year's Eve, 
but just to be fun and festive...)

Parts gin and fancy cherry liqueur with a dash of orange bitter.  
Did not necessarily blow our socks off, 
but cherry and gin is actually really nice together 
and it was all together drinkable!

For the past, we made Champs Elysees
in honor or C&E who spent their 10th anniversary in Paris in 2011...

This one was described (and I paraphrase)
 going 100 miles an hour with your hair blowing straight back and strong wind in your face...
This drink, just to note, was my personal favorite and had 
Cognac, Green Chartreuse--which isn't cheap! lemon juice and bitters


For the future, we made...
in honor of my husband 
who was going to do a detox diet starting January 1, 2012...

THE MASTER CLEANSE!!


This one DEFINITELY BLEW OUR SOCKS OFF!


It is Apple Brandy, lemon juice, maple syrup and jalapeno slices!!

At the liquor store, I definitely had to improvise, 
because they didn't have a lot of the brands/types of items the book listed.

The biggest swap was this one:  
The recipe called for Apple Brandy...the store had Apple JACK...
The diference: Brandy--more expensive; more intense apple flavor.  
My solution: to add a .5 ounce natural, unfiltered apple cider to boost the apple flavor.  

I think it was a good fix.


You start by adding several ice cubes to your glass to get it nice and cold.
I invested in a good bar jigger by OXO with clearly marked ounce lines;
You pour in all the ingredients and give a good shake....


Then, garnish with two slices of jalapeno...

On New Year's Eve, the Master Cleanse was the first recipe we tried...
I was really nervous as I passed the freshly-made creation to 
a very brave --and very good sport--C...who, 
(as we waited with bated breath...)
declared upon tasting...IT WAS DELICIOUS!!  

Oh! I was so relieved!! So we made another round and another...

It was just the right blend of sweet and tart and the little bit of heat that 
the jalapeno slices give it, is just perfect...all the flavors balances beautifully 
and it really was a taste sensation that I HIGHLY recommend...

Hooray!! 


Happy New Year, Everyone!!  

Hope 2012 a great year filled with lots of
good times with family and friends...


Friday, December 30, 2011

A Very Happy New Year to You & Yours!


Wishing your family a healthy and happy 2012!

Thank you for checking in on us this past year...
Its been great fun and I hope you have enjoyed our time together.

Lots of love,

Quentin

Monday, December 19, 2011

One Week To GO!


And the frenzy was in full force this weekend at our house....

It was a cookie-baking, card-signing, candle-making marathon and I can proudly say-- 

I made it to the finish line!  

(but barely!  : )

The highlight of the weekend:
(besides awesome cocktail party at neighbor's house...
complete with awesome baby-sitter at our house!)

was how wonderfully a couple things turned out...

First, I have to tell you--if you have never made meringues...

RUN OUT RIGHT NOW AND WHIP UP SOME EGG WHITES...

I promise you: it is the easiest thing in the world to make and you will amaze everyone with how elegant and lovely they are...same goes if you have never even had one--YOU MUST TRY ONE-- SOON!  


They are wonderfully delicious (AND! only like 25 calories a pop!)


I have always been totally intimidated by them, 
so--of course, when I saw the cover recipe in Bon Appetit, 
I had no choice: I had to try them.


Peppermint Meringues
Bon Appétit  | December 2011
by Gina Marie Miraglia Eriquez

Ingredients

  • 3 large egg whites, room temperature
  • 1/8 teaspoon kosher salt
  • 1/3 cup sugar
  • 1/2 cup powdered sugar
  • 1/8 teaspoon peppermint extract
  • 12 drops red food coloring


Preheat oven to 200°F. Line a baking sheet with parchment paper. Using an electric mixer, beat egg whites and salt on medium-high speed until white and foamy, about 1 minute. With mixer running, gradually add sugar in 3 additions, beating for 2 minutes between each addition. Beat until firm peaks form, about 2 minutes longer. Add powdered sugar and peppermint extract; beat to blend, about 1 minute.

Dot coloring over surface of meringue; do not stir (the coloring will form swirls when piped). Spoon meringue into a pastry bag fitted with a 1/2" tip. (alternatively, spoon into a plastic freezer bag, then cut 1/2" off 1 corner.) Twist top; pipe 1" rounds onto prepared sheet, spacing 1" apart.

Bake meringues until dry, about 2 1/2 hours. Let cool completely, about 1 hour (meringues will crisp as they cool). DO AHEAD: Can be made 2 days ahead. Store airtight at room temperature between sheets of parchment or waxed paper.


Next up:  Soy Wax Candles


For gifts this year, I made candles from soy wax...it was simple, fun and easy...and considering how expensive candles can be, I will definitely be making more.  

I bought a big bag of soy wax chips from Brambleberry and added a block of color...
once it all melted down, and it was off the heat--I added the essential oils: 

Cranberry Fig to the red and Siberian Pine to the green.

I poured them in water glasses I bought from Ikea.
Totally lovely and (I think...) a nice gift!


 And lastly, for today:


Home-made Chocolate-Caramel Christmas Bark

With roasted almonds and sea salt....


Dark chocolate gets melted and poured onto parchment paper.
Then, once set, milk chocolate does the same...I drizzle the butterscotch over the milk chocolate and
sprinkle with about a cup of roasted almonds and a dash of sea salt.  

I press in the almonds so they stay put...

 It gets broken up into bite-sized pieces and it pretty much never stays around long...
But it makes a great gift, too.

there is something I just cannot refuse about the salty-sweet combo.


just totally love it...


Did I mention the meringues are only 25 calories each??

: )


Monday, December 12, 2011

Ideas for a Home-Made Holiday Mantle


 Christmas is in full-swing at our house.
We got our tree this weekend--so all the boxes of decorations came out too...We were busy!

During the last two weeks, I've also been busy collecting ideas on how to 
decorate our mantle this holiday season...

(or, really, I should say I've been ripping off  the gorgeous propping and photo shoots I have seen in the million of catalogs we seem to get this time of year...)

It started with the Garnett Hill catalog...I fell in love with their (out of stock and kind of pricey) felt tree trio...check them out here.  As soon as I saw them,  a) I LOVED them and b) I knew I could make them...but then I thought...hmmm, I bet someone else out there has made them too.  

And sure enough:  check out the directions I found from Sew Homegrown here.  
I did use the paper mache cones that you can buy at Michael's...Very inexpensive and easy to work with.

Here is an overview of the mantle so far....


Oh! These little cuties are so, so sweet and I want to make a million more...I made these 2 years ago and if you love all things tiny like I do...make a couple...they were not that hard at all.
Directions here.  From Martha...


The houses are paper mache that I bought thru Hobby Lobby's website.  
I think for the three of them (small, med & large) the set was $10.  I painted 
and sprinkled glitter on them...I want to cover the windows and door with tissue
paper, so I can put a battery operated candle in them so they glow, 
but probably won't get around to that anytime soon....


The snow globe was fun to make...Got the idea here.


The topiary needs some fine tuning, i.e. smaller berries...but this was
easy to make.  I got a moss ball at the craft store, put a stick in it and then put
it in a little pot I add, using some floral oasis foam to keep it put.  
I covered the foam with moss.


The little critters are ornaments that I got on sale at Macy's.


It still kind of a work in progress, but my thinking was part village, part forrest with woodland creatures, part whimsey, and part mercury glass...I love mercury glass!!  I need to invest in some good pieces; these here are just cheap knock offs...but for now they do ok....

Monday, December 5, 2011

The Holidays Are Here!


The holidays are here and YIPEE!! I love them so much...I am especially excited because for some odd reason this year, I am WAY ahead of my usual scramble-at-the-last-minute schedule.   Christmas cards ordered: check!  Christmas gifts shopping for cousins and friends: check!  Home-made Christmas gifts for teachers and friends figured out, supplies ordered and ready to roll: triple-check!  

All by December 5...not bad!  
What makes things even nicer is pulling out the holiday crafts I have made in years past...
that are already done!  
Like my LOVELY ADVENT CALENDAR...

that I made for the kids last year.


If you google "home-made advent calendars" (and click images) 
there is gaggle of interesting and fun ideas out there...I looked at  ALOT OF THEM--everything from Land of Nod to the craft blogs...

And in the end, the one I ended up making was one that I designed myself because I wasn't seeing anything that suited me exactly right.  I have one place to put it and that is on the back of the front
door, so it had to be long and skinny...I loved the color scheme of:

Red, Hot Pint, Dark Green, Medium Green and like a lime Green


At Christmas time, Trader Joe's sell chocolate coins (from money around the world)
and the make a perfect little treat for each pocket.


This year, the kids put four in each pocket--just so Greg and I can grab a bite
of chocolate as we are headed out the door....


Did I mention how much I LOVE the holidays...


Here are some shots of the outside of the house.


Josie, The Christmas Dog...all she needs is red bow!


Monday, November 21, 2011

Happy Thanksgivings, Past & Present


I love Thanksgiving SO so much--I really do...I think it could easily 
be my favorite holiday.*  Its just about good food, being with family 
and having a little down time--which is always so needed.  

Beyond all that, of course, is the fact that Thanksgiving is a wonderful time to reflect on
 how fortunate we, as a family, are... and to be thankful for all that we have.  
This--more than anything, is what I hope
we can instill in our children about this holiday.

I am the crazy mom who, night after night, tells her kids
 if they haven't cleaned their plates with 
"Right now, there are children starving in Africa 
because they don't have enough food to eat...you need to eat all your dinner, 
because I am NOT throwing any of that food away!"  

Yes, that is me...and I am unrelenting in this when it comes to throwing food away. 
I don't do it, I loath to do it...it actually kind of breaks my heart if I ever have to toss good food.

But anyway, back to Thanksgiving...there is SO much to be thankful for, but
if I can just get my kids to really, REALLY understand how wonderful and
precious good, home-cooked food is and for them to really be thankful for it, 
I will feel like, in a big way, I will have succeeded as a parent.  
Because then, they will know what a priority wholesome food is 
and with it, they will nourish themselves and their loved ones.  

And honestly, that is all that I can ask for.


Onto the crafts...This is the GIVE THANKS banner I made two years ago.  Pottery Barn Kids
did something similar (and was the inspiration) but as I recall it was around $60+ and
there was no way I could spend that kind of money.  

So, I made one.


Here's a detail shot...I used old buttons, felt, yarn and my trusty hot glue gun.


It was fun to come up with different ideas for each letter; like each was its own work of art.
And it just adds a nice warm and festive touch to the house...

without going TOTALLY over-board--

which is what we did in this next photo...see below.


Yes, there is the thanksgiving table, in all its glory, circa 2010.


I got it in my head two or three years ago that kids would like to play with puppets!  I mean,
c'mon...doesn't every kid like a cute puppet?  Well, my kids like these for all about 5 minutes 
and then they are off to something else, but I can't help it...I still put these guys out--even if its 
only me  that plays with them!


*And just for the record, I think it was totally awesome of the Native Americans to share their food with the pilgrims and teaching them how to grow local seeds and fish in those early Thanksgivings of the 1620s...I DO NOT think it has been so great how the anglo folks have been treating the Native Americans ever since...

Thursday, November 17, 2011

Craft: A Vintage Book Leaf Wreath-For My Sister

 There is something so warm and wonderful about a beautiful wreath--hung on the front door...
welcoming you inside.  And there seems to be something so traditional about it too.
but traditional in like an ancient Greek and Roman kind of way.

From Wikipedia:

The use of the laurel wreath arose from the Greek myth involving Apollo, Zeus’ son and the god of life and light, who fell in love with the nymph Daphne. When he pursued her she fled and asked the river god Peneus to help her, in which Peneus turned her into a laurel tree. From that day forth, Apollo wore a wreath of laurel on his head. This became associated with what Apollo embodied; victory, achievement and status and would later become one of the most commonly used symbols to address achievement throughout Greece and Rome.

The Romans use of laurel wreaths echo the Greek traditions. The wreath was a symbol in the arts, literature, government and education in Roman society. In the arts, it expressed that one was valued and respected with a laurel wreath resting atop one’s head. Ovid, the famous Roman poet, is almost always depicted with laurel in his hair. Kings in both Greece and Rome donned the laurel wreath to illustrate sovereignty. Julius Caesar for example, proclaimed the laurel wreath "to be a symbol of the supreme ruler." The wreaths worn by kings were reminiscent of the traditional laurel wreath by the shape and its connotation yet were embellished with gold and gems. This eventually led to the modern day crown.


But then, there is the origins of the Advent wreath:

In Christianity, wreaths are used to prepare for the Advent season or the "coming of Christ." The first known association with these now modern day wreaths dates back to the Lutherans in Germany in the 16th century. In 1839, Johann Hinrich Wichern used a wreath made from a cart wheel to educate children about the meaning and purpose of Christmas, as well as to help them count its approach. For every Sunday of Advent, starting with the fourth Sunday before Christmas, he would put a white candle in the wreath and for every day in between he would use a red candle. The Advent wreath is constructed of evergreens to represent everlasting life brought through Jesus and the circular shape of the wreath represents God, with no beginning and no end. The Advent wreath is now a popular symbol in preparation for the coming of Christ, to mark the beginning of the Christian Church’s year and as décor during the Christmas festivities.

So, yes...very interesting!  I like to know the origin of the objects in our lives that maybe we take for granted or maybe we have no idea that this every day object had its roots in Greek Mythology--
 Just fun to know!  

My latest wreath-making project is something I wanted to make for my sister...I got the idea/inspiration/directions from Martha Stewart...See here.  
I thought this was a fitting gift and its a fun twist on an OLD idea...

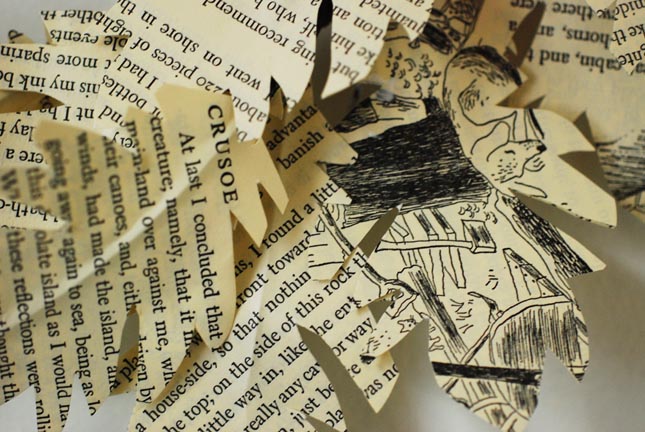
I took Luca's vintage copy of Robinson Crusoe 
(SORRY LUCA!!--I will replace, I promise!)
and cut out about 60 leaves...
and then cut out another 30 because the dogs chewed up 1/2 of the first batch! 
(but by the end, I was a pro!)  


To do this: I cut out and glued together two pages, 
with floral wire in between them.  I then cut out the leaf shape and then wrapped
brown floral tape around the base...(all very clear in Martha's directions)


and I winded and twisted them onto a circular base that I made out of more wire 
and finished the whole thing off with a pretty bow...


I think it turned out really well, but what is so cool about it is that if you get 
up close and really look, you can see some of the illustration details.  This is fun
and kind of makes the wreath come to life a bit...here are some examples:


So, there is it is: my vintage book leaf wreath for my sister.  A nice warm welcome
for her door and fun to look at too...

Hope you like it!