Monday, February 28, 2011

Recipe: Pot Stickers


Friends invited us over for dinner last night and I thought this was the perfect opportunity to make and bring homemade pot stickers.  I saw the recipe a few weeks ago and I thought they might be messy and complicated to make but could not get them out of my mind.  Turns out: they are not only simple to make; they are delicious, too!!

The recipe is from Martha Stewart's Everyday Food.  I did a vegetarian version with tofu (and more of the veggies) and also followed the recipe with shrimp.  The dipping sauce is amazing and the cooking technique is pretty much fool-proof.


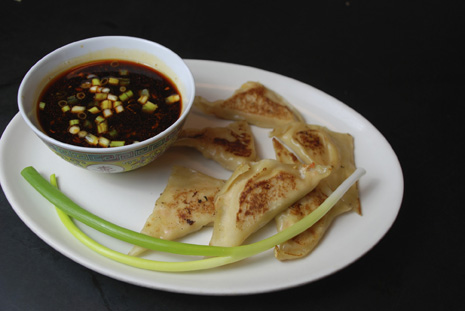
Shrimp Pot Stickers with Sriracha-Ginger Dipping Sauce
Serves 8 + Active Time: 25 min + Total Time 45 min

For Dipping Sauce:
1/2 cup soy sauce
5 tablespoon white vinegar
4 teaspoon Sriracha Sauce
2 tablespoons sugar
1 tablespoon sugar
1 tablespoon grated peeled fresh ginger
1 tablespoon toasted sesame oil
scallion greens (optional) for garnish

For the Pot Stickers: 
2 scallions, cut into 1-inch pieces
1 medium carrot, diced medium
1 large egg white
1 pound large shrimp, peeled & deveined
36 wonton wrappers
nonstick cooking spray

1.  In a medium bowl, whisk together soy sauce, vinegar, Sriracha, sugar, ginger and sesame oil; set aside.  Make pot stickers: In a food processor, process scallions, carrot, egg white, and half of the shrimp (or tofu) until paste forms.  Transfer to medium bowl. Roughly chop remaining shrimp (or tofu) and add to bowl.  Stir in 3 tablespoons of dipping sauce.


2. Working with one wonton wrapper at a time, place 1 scant tablespoon shrimp mixture in center.  With wet finger, moisten edge of wrapper, then fold over filling and press to seal. Cover filled dumplings with a kitchen towel while you work.  I used a fork to crimp edges but you can seal them by pressing down with fingers.


3. Lightly coat a large skillet with cooking spray and heat over high.  In batches, cook dumplings until golden brown on both sides, 1 to 2 minutes per side.  Carefully add 1/2 cup water to skillet, cover, and cook until water has almost evaporated and dumplings are tender, 3 minutes.  Uncover and cook until remaining water evaporates (reduce heat to medium if dumplings are overbrowning.  Transfer pot stickers to a plate.  Wipe skillet clean between batches.  Add scallions greens to dipping sauce if desired and serve alongside pot stickers.


Saturday, February 26, 2011

PHOTO: How to make a mosaic


My first love was and always will be photography.  

The first thing I was really proud of actually making were photographs; I got my first camera at eleven (a Nikon).  I was obsessed with photography all thru high school, majored in it in college and now I help to support my family with a photo-related career.   I had my own darkroom for years and especially love the old big cameras of 100 years ago and pin hole cameras.  But when I had my daughter, I realized my days in the darkroom were numbered (because of not wanting to be in constant contact with all the chemicals and just sheer lack of free time.)   It was a sad day when the realization dawned: that if I were to continue with my photography, I was going to have to put my beautiful old 4x5 large format camera up for sale on ebay (gasp!) and buy a (Nikon) digital SLR (double-gasp!).  But I did it and honestly, I have never looked back.  

And now, for me--like practically everyone, its a totally digital world.  

(I do still love film but uploading instant photos to my computer is kind of a dream come true!)

And not to mention all the fancy tricks one can do with digital images.  Right now, I am kind of crazy about the grid layout or The Mosaic and it took me a bit to figure it out, so I thought I would share how to do it.

You'll need:
a bunch of cool photos (similar or disimilar)
this link: Big Huge Labs
A flickr account is very useful and helpful but not necessary.

First go to Big Huge Labs
See my big pink: go here>>  Go there and from drop down menu, select Mosaic Maker.


That will take you to this page where you can upload each photo manually (kind of a pain...)
Be sure to select your configuration: 2 columns by 2 rows will give you a square grid with 4 photos. Go big!


OR...you could select the Flickr photoset option, and paste your Flickr set link/url. (MUCH EASIER--
See how to below).  When all set...hit CREATE.  In mere seconds, you get a great jpg that you can drag to your desk top, order a high resolutin print from Big Huge Labs or email it/blog it/facebook it to your heart's content!


If you do use Flickr, you will need to link your Flickr account to Big Huge Labs. You will be prompted to do this when you first try to create a mosaic using the Flickr Photoset option.  

Here's the how to on grabing the link and setting up in Flickr:

1) Mosey on over to Flickr and upload yer photos.
2) Click on create new set. Click save.
3) Either click edit to arrange photos in pleasing manner.  You won't be able to see them here as a grid, but you can use your imagination.  Click save.
4) Or go straight to clicking on set title link.
5) Go all the way over to other side of page and click on SHARE THIS.
6) Click on GRAB LINK and copy the whole link.
7) Go back to Big Huge Studio and paste the whole link into the Flickr Photoset field and 
Volia...un mosaic!


Friday, February 25, 2011

Craft: Felted Needle Book


 This is not the fanciest thing I have ever made or really all that exciting EXCEPT as you can see by my diminished, sad little collection of needles...I really needed one.  (These two are all I have left--I really have no idea where they go!) I loosely followed a sweet tutorial by Nini Makes.  I have always been really interested in learning how to embroider but I don't really know much about it (although that has not stopped me before) and am kind of intimidated by the whole process; just not sure where to start!  But I have to say, I really enjoyed sewing the flowers and leaves on the front cover of this little book--I didn't explode or anything, and I think I want to try doing some more..so making this project was worth it just for that.

Wednesday, February 23, 2011

DIY: Melt & Pour Soap


One of the best crafty projects I ever made was for year-before-last-christmas-gifts and that has turned into a full-time staple in my home.  And that was the making of home-made soap.  To be clear: there is one thing I do not do from scratch--that is, make the actual soap (its a complicated process involving calculating how much lye to add to your fat to make it soap--I am crazy but not THAT crazy...)  Mine is strictly the-melt-and-pour-kind of technique starting with a solid soap base (I like olive oil) and adding essential oils for fragrance (am so crazy for lavender) and natural additives (I like French powered clay)  The basic recipe for all the soap that I make is a Martha Stewart recipe for an interpretation of Savon de Marseille.  This effort for home-made soap has been made in the same spirit as not wanting any extra added yuckiness in my family's clean regime--so I don't add artificial food coloring/dyes or artificial perfumes.  Just nice and simple; pure and clean.  It could not be easier and when we get low, I just whip up another batch..here's how: 

I buy all my soap making supplies from The Sage; they are based in Utah and so nice on the phone.  I get a 5 lb. tub of Olive Oil Soap base and that lasts for a while.  I also go back and forth between the green clay and the pink clay.  I have been obsessed with Lavender for as long as I can remember..But now, I'm up for trying new scent combos: basil & orange; ylang ylang; peppermint & spearmint combined, vanilla & tangerine, rosemary & sage...time to branch out.  


This is so easy.  Think of the soap base as big hunk of chocolate that you need to melt down to make dark chocolate/sea salt/carmel bark...(ok, well, maybe not quite exactly but same in theory).  Cut a hunk of soap into smaller pieces and put in a metal bowl over a stock pot filled with 3-5 inches of water simmering away in it.  Double-boiler action.  I usually keep flame at medium-high.  Or you could put in a microwave...I don't have one so I am not sure for how long...I guess just check it often.


While that is melting down, get your molds ready.  There are a ton of molds out there to choose from.  Cute & fun to down right cheesy--not a whole lot of them worth buying in my humble opinion.  I kind of like just a simple block bar of soap.  Nothing fancy.  And these containers (along with 1/2 & 1/2 containers and heavy whipping cream containers--love the square shape!) make the best and cheapest molds in my opinion.  Just cut one like this in half--widthwise...or maybe even a little bit lower than the half way point.


As the soap melts, add the clay.   Once soap is fully melted, whisk until soap and clay are fully incorporated.  This may take a while--the clay does not instantly dissolve.  Just keep the heat on medium high and keep stirring occasionally. (But don't ever let boil.) Once you feel like its as good as its going to get--in terms of the clay disolving, turn off flame and add essential oil.

This is my general rule of thumb:  1 teaspoon clay per pound of soap & 1/2 teaspoon of essential oil per pound of soap.  Use your nose and add more if you want it stronger; you probably will but better to start off with less and add a little bit as you go to avoid over doing it (which is what I usually do)...


Add liquid soap to molds.  If you want to use the mold again, you can use a spray oil and coat lightly the inside of the mold.  OR you can tear the mold away once soap is hardened--and not bother with the oil.


Let soap hardened till cool and solidified.  About 2 hours.  Remove from mold (by coaxing out of oiled mold or tearing mold off) and slice into 1 1/2- 2 inch thick bars.  Martha's recipe does a final rinse in warm salt water and while I like the idea of this, I can't really tell what/if any difference it makes..but check out her recipe if interested in this step.

NOTE: I added about a TABLESPOON per pound of the pink clay with this batch because I wanted to try it a little darker.  Martha's recipe calls for one teaspoon per pound...this yeilds a softer, more coral in tone color--which is very nice but not truly pink.  The green is lovely too...kind of a dusty olive. I really like it.

And that's it!  You should try it...its not hard and its really not all that time-consuming--you might just get hooked, like me...and what a lovely gift this would make: a bar of home-made soap be paired with a little crocheted/knitted wash cloth??  Cute!  That project is coming up--stay tuned!


Tuesday, February 22, 2011

Crafts for a nice long weekend...


Last week, I came across this fun, practically no-cost (we had everything on-hand already) craft idea from Bella Dia.  The tutorial is for making houses out of cereal boxes (or mac and cheese boxes, tea boxes, cracker boxes...you get the idea...)  It was the perfect craft for a long weekend because you make the houses in steps, letting glue and paint dry in between...

So, while we waited, it was fun to get my butt whooped by my 6 year-old as we played "No-Stress Chess"  (maybe for my opponent!) that our wonderful friends Clio and Dario gave Magda for her recent birthday.  This is her just after she check-mated me...smarty pants...

Saturday, February 19, 2011

Inspiration for the coming weeks

Do you know Pinterest?  If you do, then you LOVE Pinterest...and since Easter isn't until APRIL 24th this year, I have all the time between now and then for all sorts of little non-holiday/non-seasonally themed crafts...like these...that I have been stashing away from every visit to Pinterest.  I am partial to the DIY section...

Actually, what I really want to make (besides quilt number 5) is a felt needle book...a cute little place to stash my needles so I don't spend all my time hunting them down...its kind of crazy how much time I spend doing this, but anyway, am thinking about something like this.

Hopefully it will turn out so well that I will post it one of these days...
Have a great long weekend!


Friday, February 18, 2011

Paper Cutting

I painted Magda's room last summer and then proceeded to rearrange her furniture.  The new configuration left bare a HUGE hole I made hanging some art that wouldn't work with the new set up..all this is to say: I had a bare wall with a gaping hole that desperately needed some new art work to cover it all up. This was a craft emergency; I had to make something--but what?  After much thought and deliberation, I settled one of my favorite crafts of all time...cutting paper.


click on images to get a better look..


My fave for this is Amy Karol over at Angry Chicken.  She has a great blog and she offers eMail Orders for her different original craft projects.  #8 & #10 each offer 4 different patterns.  You can go here to check out.  I have downloaded her pdfs in the past, cut them out and framed them for gifts--which I think is so very sweet.  I am always really pleased with how they turn out.


click on images to get a better look..


Amy gives very clear and helpful instruction and tips (mainly just use a very sharp x-acto knife) These come together so nicely and easily, I whole-heartedly recommend them.  And then, when you get really hooked, you can look to the magical work by Elsa Mora for inspiration...OR you can just get lost in it...either way is good.

Thursday, February 17, 2011

Recipe: DATE SHAKE


If you grew up in or spent any amount of time in Southern California and took trips to Palm Springs AND if you were lucky enough to go thru a little town called Indio--you know exactly what I am talking about...DATE SHAKES...loved them as a kid and with my re-discovery of the date --I really like the idea of them now...but while I remember the original shake (with vanilla ice cream; NYTs shares the recipe here) being a little bit out of the every day realm, my sis told me that she makes a dairy-free version and I thought that was a great idea; so here is my recipe...feel free to ammend to your liking.
Its really good and my kids LOVE it!!

Serves: 2

Ingredients:

1 cup almond milk (unsweetened)
1 frozen banana (peeled and cut into chunks before frozen) OR not frozen but add 2-3 ice cubes
6 dates (Medjool variety are best) about 1/3 cup; give them a rough chop
2 tablespoons hot water
1 tablespoon of maple syrup or other sweetener like agave nectar--use a little less if using agave.
1 teaspoon vanilla extract
a little protein powder never hurt--I add a tablespoon of hemp protein powder in the morning.
dash of cinnamon and/or nutmeg (optional)


Directions:

Put the dates in a small bowl and sprinkle with the warm water. Let soak for 5 minutes to soften, then drain.  This step can be skipped but you may end up with bits of dates at bottom of blender.

Place almond milk in blender and at high speed, add dates, a little at a time until the dates are completely pulverized. Add frozen banana chunks, one at a time; blend till smooth. Add sweetener and spices--give one last whirl and serve immediately!

just a little side note: organic dates are EXPENSIVE; conventional dates--not so much.  just fyi..


Wednesday, February 16, 2011

DIY: Home-made Facial Toner


THe cleanse I recently did was illuminating in a lot of ways. One major insight gained from reading Dr. Junger's book was the fact that equally important to what we eat and put into our bodies thru our mouth is what we put directly onto our skin (and this is not just limited to soaps, creams & lotions--think about all the chemicals that go into deodorant, perfume, hair products, dry cleaning, etc). I have long made an effort to keep the sulfates, parabens, artificial colors & smells at bay, but recently I went one step further and purged my medicine closet and thru away any and all offenders of the artificial or petro-based kind. And because as much as I LOVE all the organic skin care lines out there, especially Dr. Hauska---I cannot afford them, ESPECIALLY Dr. Hauska...so this is when that handy-dandy phrase pops into my head and sends me into a dither...hey, I wonder if I could MAKE Dr. Hauska...

and sure enough...

I googled...

and I found a recipe posted by DandelionMom

Dr. Hauska Toner Recipe

This is really nice, easy to make AND IT SMELLS AMAZING...my craft room smells like the skin care aisle at Whole Foods...I love it! Just a note: chamomile and rose essential oil are costly. I am looking around for better options/subsitutes and think I found them here and here.  These aren't the oils but they have the essential smell which is what we are going for.  I will try them and report back.  Special thanks to my sis-in-law Gab who lent me her essential oils for the grand experiment. I can absolutely report that this is indeed a VERY nice toner and this has inspired me to make more home-made skin care products. Also, a lot of blogs I follow do these fun give-aways to readers who post a comment. I am not quite ready to host a give-away, but do stay tuned and I will do one soon.

Ingredients

Water
a spray bottle
witch hazel
German chamomile essential oil
rosemary essential oil
Rose essential oil
100% Aloe Vera Gel


Combine 1/2 cup purified water with 2 Tbsp. witch hazel, 2 Tbsp. aloe vera gel, and 3 drops of each essential oil.

Place a funnel over the opening of your bottle and pour the ingredients into the bottle. Screw on the top.

After cleansing your skin with a natural, pure soap, spritz on the toner with spray pump top or dab a cotton ball and allow it to soak into your skin! You will LOVE it!!!


Tuesday, February 15, 2011

A quilt for the closet


Doesn't every girl wish for a towering linen closet packed with hand-made quilts made lovingly from the hands and hearts of the family women that have come before her? 

 No? Maybe?? 

Well, I do and it was a sad, sad day for me when I realized my dowry was pretty empty and I would not be inheriting a hankie, much less a treasure trove of hand-made quilts...

but then--I had a moment of clarity; that was when I decided that *I* would be that woman...

I would be that great-grandmother that started the cycle: lovingly making and passing down quilts to my children & grandchildren; and then these --
in turn- could be passed onto my grandchildren's grandchildren and on and on..

I would make that closet full...


Wow...did that thought make me really happy.

So, I taught myself how to quilt.


  Its really not that hard, its a wonderful process and so what if it takes a year to complete...
it is so totally worth it. So far, I've made 4 quilts. 

 I got a little ahead of myself on a couple, maybe going a little too advanced with pattern choice, so for the 4th one, I decided to dial it back and really try to master certain aspects & techniques...
(aka measuring and cutting correctly.) 

 I happen to find the mother lode of all quilt tutorials, the mecca of online quilters everywhere...
Old Red Barn Co.  And Dana is fantastic. 

I followed her expert instruction exactly and am so pleased with this quilt I just finished and gave to Magda for her 6th birthday. 

 (it was supposed to be for her 5th birthday, so you see what I mean about taking a year...)


I love the whole process: settling on a pattern, picking the color scheme/the fabrics...making that first cut...sewing the top together and seeing it take shape...

I love pinning the whole thing together and cramming it thru the sewing machine to quilt it all together. 
(ok, maybe not so much...) 

This time, I actually took my time and hand sewed the binding that was very satisfying and in the end, cutting all the little white threads off, throwing it in the wash and 
seeing my daughter's eyes go as wide as plates when she unwrapped it...she had no idea I had been working on it-- was a total surprise to her.  

She grabbed it, hugged it and then ran over and hugged me and thanked me for all the hard work I put into it just for her--she actually said that.  

She felt loved and I felt proud...


and I know my great granddaughter will feel grateful.

Monday, February 14, 2011

we HEART teachers!


Maybe its because I am married to one and I see on a daily basis how incredibly committed he is, or maybe its because I realize its a special person that wants to hang out with kids every day or maybe its because these angels really want to make a difference in the world, one child at a time...there are a million reasons and whatever it is, I like to take one holiday to make a special effort to thank the teachers in our lives. Sometimes it Christmas, but its hard to get it together then, so more often than not, for us, its Valentine's Day...because nothing says THANK YOU like red wine and dark chocolate...(and for those of you wondering about me and my cleanse...this is not about me...its about them! : )

So, this year, we did a little more than usual. I made this super easy milk chocolate/dark chocolate/carmel/smoked almond/sea salt loveliness...(recipe below) and some linzer torte cookies (full disclosure: cookie dough magically appeared in my fridge...pretty sure it was the mother-in-law cookie fairy). All went into these cute little boxes that I bought a gazillion of a while back, so all set in the gift box department. With a little ribbon and pink heart tag...pure love...


Easy Chocolate Confection that will knock your socks off

I am pretty sure this flavor combo was inspired by Giada somewhere along the way...she does little turtles which are incredible. This is more of more of a bark or you can slice it all one way and then again the other way for neat little squares that fit perfectly into cute little gift boxes.

1 bag milk chocolate chips (highly recommend Ghirardelli)
1 bag bittersweet chocolate chips (60% cacao)
batch of caramel (store bought or home made; this is a good recipe)
1 cup (or a little more) roasted or smoked almonds--if you use smoked, use less sea salt.
sea salt


On a double-boiler, melt the dark chocolate. While that is heating up and melting down, put a piece of parchment paper down on a cookie sheet and get the caramel ready. When chocolate is melted, with spatula, spread it as evenly as you can on parchment paper. Don't worry about shape but try to get it a rectangular as possible. Let it cool for about 5 mins. Spoon caramel over chocolate in kind of swirly way. Don't be shy. Put tray in fridge and let set. Melt milk chocolate. Chop almonds in a medium chop. When milk chocolate is melted and dark chocolate/caramel is a bit firm to touch, spread milk chocolate on top. Try to even up the edges, but it really doesn't matter all that much. Sprinkle almonds over the top of that...press down gently with your fingers so almonds stay put. Sprinkle ever so lightly with good sea salt. Stick in fridge for a couple hours or overnight until fully set. Break up into irregular pieces or cut into squares and enjoy.


happy valentine's day everyone...I leave you with one last bit of cuteness that came from this awesomeness...


Friday, February 11, 2011

Godiva--it is not...


My husband & I recently did a 28-day cleanse. We followed Dr. Alejandro Junger's CLEAN program and if you read Goop you know what I am talking about...its was basically four weeks of no dairy, no gluten, no sugar, no alcohol, no caffeine, no soy, no corn, no night shade veggies...did I mention NO ALCOHOL?? And it was challenging, for sure. But what probably the most enlightening part of the whole thing was the fact that it showed me that we didn't really eat as healthy as I thought we did. I mean we have always put a huge priority on organics and cooking at home and eating a healthy diet filled with fruits, vegetables, moderate dairy, lean protein and whole grains. But even in this healthy diet, there are still items that our bodies have a hard time breaking down and leave us feeling sluggish. Dairy and gluten are the two big culprits. Anyway, this post is about how I am kind of changing my way of thinking about food and am embracing this new way of eating as a lifestlye change...and as hard as it was to turn this moving train around (imagine The Barefoot Contessa going gluten/dairy free--simply does not compute!) we both feel good and will just see how this whole thing progresses.

Ok, so I was looking for a recipe for energy bars for the kids in this new spirit of change and I came across this recipe. It sparked a whole lot of other ideas for other tasty flavor combos. I have shaped mine into balls instead of bars because I thought the whole truffle shape was a nice touch with Valentine's Day coming up, but don't get your hopes up THAT high...But they are good, just in a different kind of way. Finally, I just have to say, the lowly date is an amazing powerhouse packed with sweet goodness...I highly recommend them!


Fruit-and-Nut Energy Bars
by Family Fun Magazine
Ingredients
  • 1/3 cup pecans
  • 1/3 cup dried apples
  • 1/3 cup pitted dates
  • Cinnamon

Instructions
  1. To make apple-pecan bars, grind 1/3 cup pecans in a food processor fitted with a steel blade. Transfer the nuts to a bowl, then process 1/3 cup each pitted dates and dried apples. Add the nuts and a pinch of cinnamon, then process until the mixture holds together when squeezed.
  2. Add the nuts and a pinch of cinnamon, then process until the mixture holds together when squeezed.
  3. Divide it into six portions, mold each into a bar, and wrap in plastic wrap. Store in an airtight container in the refrigerator for up to a week. Makes 6 bars.
More Fabulous Flavors
Follow the steps above, using 1/3 cup of the nuts and 1/3 cup of each dried fruit:
Apricot Muffin: dates, dried apricots, and almonds
Cherry Tart: dates, dried cherries, and walnuts
Peanut Butter Snap: dates (2/3 cup), peanuts, 1/4 teaspoon vanilla, and a pinch of salt
Tropical: dried mango, dried pineapple, pecan, finely shredded coconut
Chocolate-Almond Truffle: sliced almonds, 3/4 T. unsweetened cocoa powder (more to taste), agave. shredded coconut (optional)
My Personal Fav--Cashew Cookie: dates, cashews...perfect.


Thursday, February 10, 2011

My super hero, plates & candlestick holders


Very little I make actually originates in my head...most all of the things I do come from ideas I see online, in magazines or in real life...I think that's why I get so hooked, the idea of something can be a very powerful thing! So, I see all this great stuff that I want to make, but I have this day job that takes up A LOT of my time, so when I see something particularly seductive that I cannot stop thinking about but have no way of getting to the craft store/thrift store/fabric store to make my dream a reality...well, let's just say that is the time I call in the big guns...my secret crafty weapon...my mother-in-law. The convo goes somthing like this: me: Hello...she: HI!...me: so I was just wondering if you had any such and such items (like vintage china plates) OR if you were by any chance at all going by the craft store or if this or that and on & on...she: Q--what do you need and I am on it! And she swoops down, comes to my rescue and saves the day! I am such a lucky girl! The last time this happened was when I saw a photo of 3-4 vintage plates alternating with supports of glass candle stick holders and a thin glass bud vase. LOVE AT FIRST SIGHT. My super-heroine leaped with a single bound to her local thrift store, bought a lovely array of china plates & glass votives and brought them to me to epoxy them all together into something quite lovely. It was wonderful. I think this project would work great with mid-century plates and more modern plates too. Plus, they would make great gifts...Thanks again Chrystie!! You are the best!!


The examples that sparked the flame....


Wednesday, February 9, 2011

Treasure Hunt for Little Girls

Recently, my little girl turned six and we invited 3 of her friends from her kindergarten class to come over and help celebrate. As a fun activity, I hid a series cryptic clues that would lead the girls to treasure and more clues for more treasure until each little girl (and one eager little brother) each had found their own special gift. It worked really well and it fun to watch them all work together to solve the clues (was like watching a lightbulb come on when they figured it out) and race to where the treasure was hidden. It worked like this: At the beginning, I told them the rules (they had to work as a team and no one could open their box until everyone had found their's) and gave them one fancy pink envelope with a mysterious clue written on the card inside. For instance, one clue read: Little people live in this house, so please be as quiet as a mouse. The girls would read the card...SQUEAL in delight...then run upstairs to my daughter's room and look in her doll house; there would be a small gift with a girl's name on it and another clue (in an envelope) to where the next treasure was hidden. For five kids, I'd say it was a solid 25 mins of a great time!

The Gifts...pre-hunt


The Clues...post-hunt


The Hunt


The Booty! Including home-made rose soap, a fancy ring, a vintage hankie & some truffles...

An Opportunity for Art

When we moved into our new house, one of the first thing we did was take out the closets doors in the kids' rooms and the playroom...The doors were old, beat up and just kind of ick...basically left with a blank canvas, something crafty was bound to happen!

Play Room Curtains
These panels are great because they were easy to make and they easily hide all the kids' stuff but still make it all very accessible. My tip of the day: IKEA FABRIC..inexpensive and amazing!!


Magdalena's Room

These started out as the panels for a puppet theater but work better as curtain panels for her closet in our new house. Its kind of a random block pattern that is way easier to put together than it looks. Crucial that all cuts are exactly the same size and then it kinds of lines up all by itself...if you look closely, you can tell that I did not follow my own advice! I LOVE the pom-pom trim...